How to setup email on your device
When you have purchased a web hosting package from KPH Media, it will always come with some free email. You have two options to start using your new email accounts :
- Webmail - an online service which you can accress from any browser. You can log into Webmail here:
https://webmail.irishdomains.com/ - Email client software - an app or software product such as Microsoft Outlook or Apple Mail.
This is a guide on how to set up KPH Media Shared Hosting email on Microsoft Outlook 2019.
We would recommend that you check that you have the correct password for the email account by testing it via the webmail login here:
https://webmail.irishdomains.com/
- The username is always the full email address, in the format yourname@yourdomain.com or yourname@yourdomain.ie
- The password is the one supplied to you
If you find that the login is not working via the webmail link above - then it's probably not the correct password and you will need to contact KPH Media and request a new password.
Setting up the email account on a device
Outlook will try to fetch setup information automatically but will be unable to do so, as such you need to keep clicking Connect (or Next) until it lets you proceed to the next step to enter details manually.
- 1. Open Outlook
- 1.1 Go to File >> Add Account and type in your email address
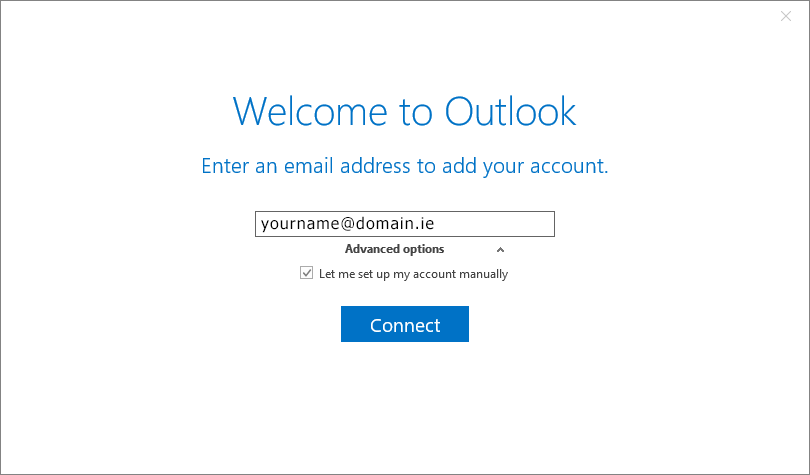
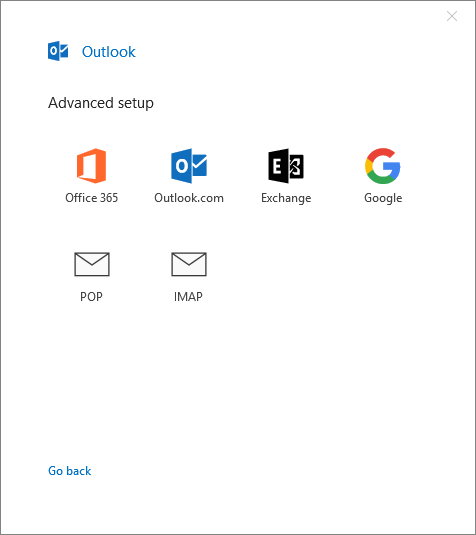
- 2. Choose IMAP from the list shown
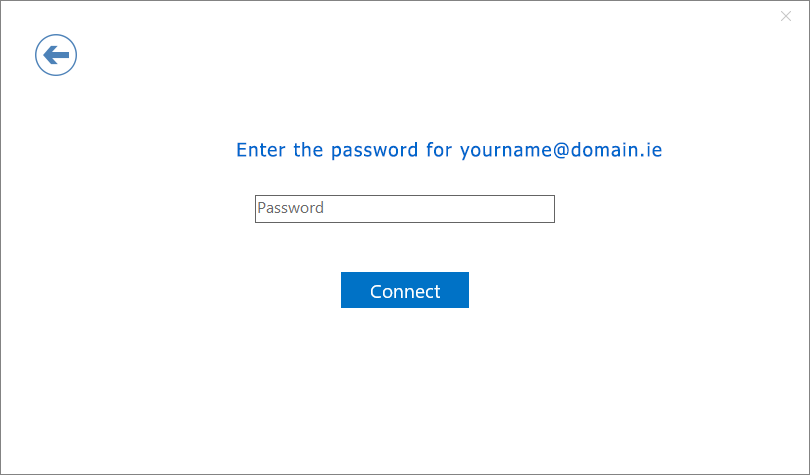
- 3. Type in your password
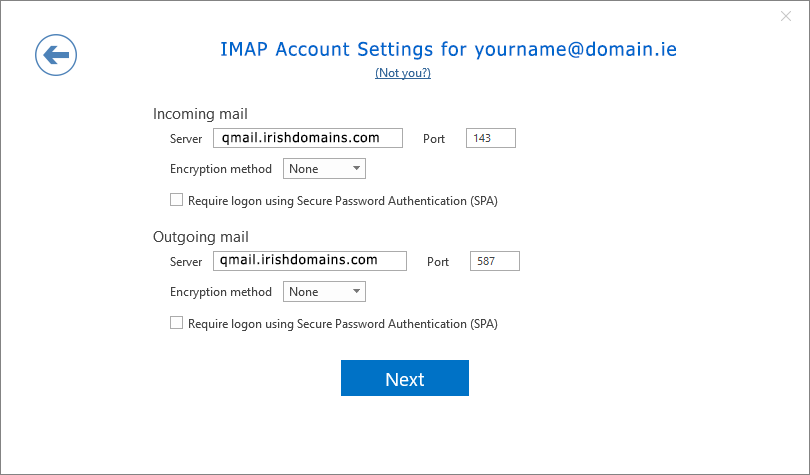
- You will be presented with this screen, enter the information as per the image below.
- Note that you must use qmail.irishdomains.com as the Incoming (Port 143) and Outgoing (Port 587) server hostnames.
- Use 993 and SSL/TLS for the Incoming Connection
- Use 587 and STARTTLS (or TLS) for the Outgoing connection.
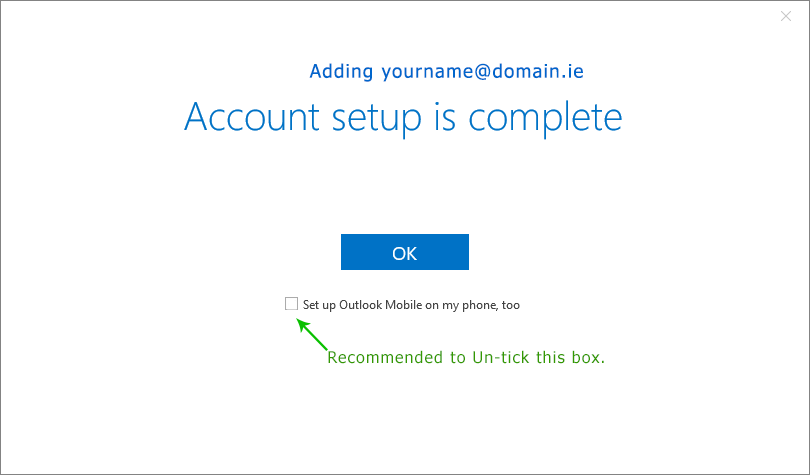
- 4. The Account should now be added successfully.
- We recommend unchecking the box for "Outlook Mobile" and then click OK to finish the process.
This is a guide on how to set up KPH Media Shared Hosting email on Microsoft Outlook 2016.
We would recommend that you check that you have the correct password for the email account by testing it via the webmail login here:
https://webmail.irishdomains.com/
- The username is always the full email address, in the format yourname@yourdomain.com or yourname@yourdomain.ie
- The password is the one supplied to you
If you find that the login is not working via the webmail link above - then it's probably not the correct password and you will need to contact KPH Media and request a new password.
Outlook 2016
- Click Start and then type "Control Panel" and press enter on the keyboard.
- Choose "Mail (Microsoft Outlook 2016)"
- Click on "Email accounts".
- Click on "File"
- Click on "Account Settings" (On the info section)
- Click on "New" ("Change" if the account already exists)
- Click on "Microsoft Exchange, POP3, IMAP, or HTTP" and press Next (If creating new)
- Click on "Manually configure server settings or additional server types" and press Next
- Click on "Internet E-Mail" and press "Next" (If creating new)
- Your Name: Whatever name you want to appear on your Emails.
- E-Mail Address: Your full email address.
- Account Type: POP3 (or IMAP if you want to use IMAP).
- Incoming Mail Server: qmail.irishdomains.com.
- User Name: Your full email address.
- Password: The password you assigned to the email account when it was created.
- Press "More Settings" and go to "Outgoing Server".
- Select "My outgoing server (SMTP) requires authentication".
- You can set it to "Use same settings as my incoming mail server".
- Press "Advanced" and change the outgoing server port from 25 to 587 and press OK.
Outlook 2010/2013
Open Outlook on your device and carry out the following steps.- Click on "File"
- Click on "Account Settings" (On the info section)
- Click on "New" ("Change" if the account already exists)
- Click on "Microsoft Exchange, POP3, IMAP, or HTTP" and press Next (If creating new)
- Click on "Manually configure server settings or additional server types" and press Next
- Click on "Internet E-Mail" and press "Next" (If creating new)
- Your Name: Whatever name you want to appear on your Emails.
- E-Mail Address: Your full email address.
- Account Type: POP3 (or IMAP if you want to use IMAP).
- Incoming Mail Server: qmail.irishdomains.com
- Outgoing Mail Server (SMTP): qmail.irishdomains.com
- User Name: Your full email address.
- Password: The password you assigned to the email account when it was created.
- Press "More Settings" and go to "Outgoing Server".
- Select "My outgoing server (SMTP) requires authentication".
- You can set it to "Use same settings as my incoming mail server".
- Press "Advanced" and change the outgoing server port from 25 to 587 and press OK.
Outlook 2007
Open Outlook on your device and carry out the following steps.- Click on "Tools"
- Click on "Account Settings"
- Click on "New"
- Click on "Microsoft Exchange, POP3, IMAP, or HTTP" and press Next
- Click on "Manually configure server settings or additional server types" and press Next
- Click on "Internet E-Mail" and press "Next"
- Your Name: Whatever name you want to appear on your Emails.
- E-Mail Address: Your full email address.
- Account Type: POP3 (or IMAP if you want to use IMAP).
- Incoming Mail Server: qmail.irishdomains.com
- Outgoing Mail Server (SMTP): qmail.irishdomains.com
- User Name: Your full email address.
- Password: The password you assigned to the email account when it was created.
- Press "More Settings" and go to "Outgoing Server".
- Select "My outgoing server (SMTP) requires authentication".
- You can set it to "Use same settings as my incoming mail server".
- Press "Advanced" and change the outgoing server port from 25 to 587 and press OK.
Outlook 2003
Open Outlook 2003 on your device and carry out the following steps.- Click on "Tools".
- Click on "EMail Accounts".
- Click on "Add new email account".
- Click on "Microsoft Exchange, POP3, IMAP, or HTTP" and press Next.
- Your Name: Whatever name you want to appear on your Emails.
- E-Mail Address: Your full email address.
- Account Type: POP3 (or IMAP if you want to use IMAP).
- Incoming Mail Server: qmail.irishdomains.com
- Outgoing Mail Server (SMTP): qmail.irishdomains.com
- User Name: Your full email address.
- Password: The password you assigned to the email account when it was created.
- Press "More Settings" and go to "Outgoing Server".
- Select "My outgoing server (SMTP) requires authentication".
- You can set it to "Use same settings as my incoming mail server".
- Press "Advanced" and change the outgoing server port from 25 to 587 and press OK.
Press Next and Finish to finish setting up the email account.
https://webmail.irishdomains.com/
- The username is always the full email address, in the format yourname@yourdomain.com or yourname@yourdomain.ie
- The password is the one supplied to you
If you find that the login is not working via the webmail link above - then it's probably not the correct password and you will need to contact KPH Media and request a new password.
Apple Mail setup instructions
Please ensure to follow these instructions carefully as Mac Mail will not accept the email address unless these settings are specified.
- 1. Open Up Mac Mail and browse to the following:
- Mail > Add Account > Other Mail Account
- 2. Provide the following settings:
- Name: What you would like others to see when you send them an email
- Email address: The email address you are adding to Mac Mail
- Password: The password for this specific email address you are adding